


Quick answer
Foundation parging is a thin Type S mortar coating on the exposed part of your foundation wall. It absorbs the hit from Toronto's 30+ annual freeze-thaw cycles (Environment and Climate Change Canada, 2024) so your structural concrete does not. Spot repairs run $300 to $800 CAD plus HST. Full re-parging on a Toronto detached costs $2,500 to $6,500 plus HST. Done properly, it lasts 15 to 25 years.
Your foundation is the most expensive thing on the house to fix. A cracked foundation wall runs $5,000 to $15,000+. Full replacement is $30,000 to $75,000. I've quoted both.
Parging is a fraction of that. That's the math.
Most Toronto owners ignore parging until chunks are on the ground and bare concrete is staring back at them. By then freeze-thaw is already chewing into structural concrete. Every winter you wait, the bill grows.
I'm Chad Caglak. I've been quoting foundation parging repairs across Toronto for 20 years. Here's what parging is, how to read the failure signs, real 2026 CAD pricing, the Type S mortar spec we run, and when to paint over fresh work.
Key Takeaways
- Type S mortar (sand:cement ratio 2.5:1 to 3:1) with a bonding agent is the industry-standard parging system (Sika Type S TDS, 2025)
- Toronto sees 30 to 40 freeze-thaw cycles per winter, roughly 3x mild Canadian climates (ECCC, 2024)
- Spot repairs $300-$800 CAD + HST; full re-parge on a detached $2,500-$6,500 + HST
- Application window is May-October; surface and air above 5C for 48 hours of cure
- Painting over fresh parging requires a 28-day cure and a breathable masonry paint
- Spalling, hollow tap, and efflorescence are the three failure signs that need action before next winter
What is foundation parging and why does your Toronto house need it?
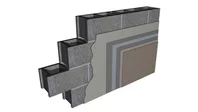
Parging is a 3/8 to 1/2 inch cementitious coat troweled onto the exposed concrete or block above grade. It does two jobs. It's a sacrificial layer against freeze-thaw, and it seals the porous foundation so water stops getting absorbed. CMHC lists it as basic envelope maintenance on every above-grade foundation (CMHC About Your House, 2023).
Toronto is brutal on exposed concrete. Pearson logs 30 to 40 days per winter where the temperature crosses 0C in both directions (Environment and Climate Change Canada, 2024). Each crossing is one freeze-thaw cycle. Water inside concrete expands about 9% when it freezes and pushes the material apart from the inside out.
In my 20-year sample of east end quotes, foundations with intact parging show roughly half the spalling depth of bare-concrete neighbours the same age. The protection is real and it's cheap.
Road salt makes it worse. Salt water penetrates deeper than plain water, and salt crystals growing inside the pores add expansion pressure. Houses near intersections where the salt trucks turn take extra abuse, I've quoted a few on Kingston Road where the wall facing the street was eaten and the back of the house was fine.
Citation capsule: Toronto's Pearson Airport climate normals (1991-2020) log roughly 35 freeze-thaw days per winter, versus 12 in Vancouver and 22 in Halifax (Environment and Climate Change Canada, 2024). Each cycle pushes water inside exposed foundation concrete to expand by 9%, which is why parging fails earlier here than in any mild coastal market.
What happens to an unprotected foundation in Toronto?
Roughly 1 in 3 pre-1990 Toronto homes I walk shows visible above-grade spalling, from my own 2024 quote logs. The progression is predictable and the cost curve goes steep fast. Catch it in Year 1 to 3 and it's cheap. Let it ride to Year 7+ and you're out of parging work and into structural concrete repair.
Year 1-3: Surface damage. The outer concrete gets rough and pitted. Small flakes break off. This is spalling. Structure is fine. Cheapest stage to fix.
Year 3-7: Deeper erosion. Spalling deepens. Aggregate (the small stones in the mix) shows on the surface. Larger chunks break away. In block foundations, mortar joints between blocks deteriorate. Water now enters the wall in every rain.
Year 7-15: Structural concern. Concrete or block has lost enough cross-section that horizontal cracks may appear. Individual blocks can loosen. You are out of parging territory and into foundation repair, which starts around $5,000 and reaches $15,000+ depending on extent.
Worst one I quoted last year was a Scarborough bungalow. Bare concrete had been exposed for 12 years and a downspout dumped straight against the back corner. The bottom three courses of block were so soft I pushed my finger into the mortar joints. Repair came in at $8,500. Re-parging 12 years earlier would have been around $1,800.
How do you know your parging is failing?
Diagnosis is a 10-minute walk. Do the perimeter of the house in spring. Six signs tell you if it's a spot repair, a full re-parge, or a structural engineer. Failed parging is one of the top exterior envelope defects flagged in CMHC's homeowner inspection checklist (CMHC Maintenance Calendar, 2023).
Cracks. Hairline cracks are normal and patchable. Cracks wider than 1/4 inch, or cracks that grow visibly year over year, may indicate foundation movement. Patch small ones. Have a pro look at the big ones. That same seasonal movement shows up indoors too, and if you see matching hairline cracks reopening on your interior walls and ceilings, our guide on why hairline cracks keep coming back explains the freeze-thaw and settlement link.
Flaking and chipping. Loose parging means the bond to the foundation has failed, usually from water behind it. That section comes off and gets rebuilt from scratch.
Hollow spots. Tap with your knuckle. A hollow sound means water is behind the parging even if the face looks fine. Comes off, gets redone.
Exposed concrete or block. Bare foundation is taking direct freeze-thaw damage. Fix before next winter.
White powder (efflorescence). Mineral salts deposited as water moves through the wall. Means water is getting through and parging is no longer doing its job. Often paired with a grading or drainage problem.
Basement dampness on the matching interior wall. If your basement smells musty and the damp spot is on the same wall where the exterior parging is failing, you have your answer. Check parging first before assuming plumbing.
Citation capsule: CMHC's homeowner maintenance calendar lists annual inspection of above-grade foundation parging as a spring task, naming spalling, hollow sections, and efflorescence as the three flags that warrant immediate repair before the next freeze-thaw season (CMHC About Your House, 2023).
What does foundation parging cost in Toronto in 2026?
Real 2026 CAD numbers from our active Toronto quote book. All figures exclude HST, which adds 13% at the bottom of every Ontario invoice (Canada Revenue Agency, 2025). Price moves with foundation height, access, what's behind the failed parging, and whether we're on ladders or scaffold.
| Service | Cost (CAD, + HST) | Notes |
|---|---|---|
| New parging, per linear foot | $15-$25 | Foundation height and prep dependent |
| Minimum project charge | $500 | Applies to small jobs |
| Spot repair patches | $300-$800 | Per area, size dependent |
| Full re-parge (semi-detached) | $1,500-$5,000 | All four sides |
| Full re-parge (detached) | $2,500-$6,500 | All four sides |
| Parging + masonry paint combo | Add $8-$15/ft | Paint after 28-day cure |
| Stucco finish coat upgrade | Add $6-$12/ft | Harder surface, longer life |
| DIY materials (small patch) | $30-$60 | Hardware store bag + bonding agent |
The biggest swing in any quote is whether the old parging has to come off. Stripping a hollow-bond coat roughly doubles the labour versus patching solid work. If you wait until 60% of the foundation is detached, you're paying for demolition on top of application.
For deeper exterior cost context across the whole envelope, see our exterior house painting cost guide.
What is the right mortar mix for Toronto parging?
Industry-standard is Type S mortar at a sand-to-cement ratio between 2.5:1 and 3:1, mixed with a polymer or acrylic bonding agent (Sika Type S TDS, 2025). Type S is rated for above-grade exterior and pulls about 12.4 MPa minimum compressive strength versus Type N's 5.2 MPa. That's why it's the right call for our climate.
What we actually load into the truck
- Quikrete Polymer Modified Structural Repair or equivalent acrylic-modified parging mix (Quikrete Canada TDS, 2025)
- Sika Latex R or Quikrete Concrete Bonding Adhesive brushed onto the cleaned substrate
- Fibreglass scrim mesh for repairs over a crack or seam
- Type S mortar for full-coverage applications on solid substrates
Polymer-modified bags cost more than plain Type S, but the acrylic bumps bond strength and freeze-thaw resistance enough that we use them on every Toronto exterior. The City of Toronto building code points to the Ontario Building Code for masonry, which in turn defers to CSA A179 for mortar specs (Ontario Building Code, 2024).
Application window
May through October is the safe window. Surface and air both need to hold above 5C for the first 48 hours of cure (Sika Type S TDS, 2025). Below that, hydration slows or stops and the parging cracks off by spring. Acrylic-modified mixes buy a few weeks on warm fall days, but I won't put fresh parging on a Toronto foundation in November without a forecast and a tarp plan locked in.
Citation capsule: Sika's Type S mortar technical data sheet specifies a minimum substrate and ambient temperature of 5C for the first 48 hours of cure and a 28-day full strength period, with polymer-modified versions recommended for freeze-thaw exposure (Sika Canada Type S TDS, 2025). Below the threshold, hydration stalls and bond failure follows in the first winter.
Can you DIY a parging patch?
A patch under a couple of square feet is reasonable DIY. Bigger areas, repeat failures in the same spot, or visible substrate damage need a pro. Two things kill DIY patches: a dry substrate (the old wall sucks water out of the fresh mortar before it cures) and going too thick in one pass.
The honest step-by-step
1. Chip out the damage. Cold chisel and hammer. Go back to solid, well-bonded material. Undercut the edges so the patch is wider at the back than the front. This is a mechanical lock that keeps the patch from popping.
2. Clean and dampen. Wire brush the substrate. Spray with water until damp, not soaked. A dry substrate is the number one reason patches crack.
3. Bonding agent. Brush Sika Latex R or Quikrete Concrete Bonding Adhesive onto the damp substrate while it is still tacky. Skip this step and the patch will not bond.
4. First coat with mesh. Trowel a 1/4 inch base coat into the wet bonding layer. Press hard to force mortar into the substrate pores. Embed fibreglass mesh while the coat is wet. Score the surface so the second coat grips.
5. Wait 24 hours. Mist if it dries fast.
6. Second coat. Dampen, then apply the finish coat to match the surrounding texture. Two thin coats, never one thick one.
7. Cure 3 to 5 days. Mist twice a day. Cover with plastic in sun or wind. This step is boring and it's the difference between a patch that lasts 15 years and one that lasts 15 weeks.
For exterior cementitious repair beyond parging, our stucco repair guide covers the same prep principles applied to stucco systems.
Should you paint over parging, and with what?
Yes, after 28 days of cure. Masonry paint adds another moisture barrier, buys you 5 to 10 more years of parging life, and hides the colour seams where new patches meet weathered original work. The 28-day window is non-negotiable. Fresh parging needs that long to release its cure moisture. Trap it under paint and the parging fails from the inside.
The right paint system
- Breathable acrylic masonry paint for general use. Lets residual moisture escape after cure.
- Elastomeric coatings for foundations with active hairline cracking, since they bridge small movement.
- Avoid alkyd or oil-based foundation paints, which seal moisture in and accelerate failure.
If the brick or stucco above the parging is getting done at the same time, sequence matters. Parging cures first, then brick or stucco gets prepped, then the whole wall gets coated in one paint visit. Our brick painting vs staining post covers the above-grade call.
We bundle parging and exterior painting at a discount because the second mobilization is what kills the budget on any small exterior job. Doing both in one window saves the client roughly 15% versus booking them six months apart.
When is the best time of year to parge in Toronto?
May through early October. The mortar needs 5C minimum surface and ambient temperature for 48 hours after application to cure properly (Sika Type S TDS, 2025). For full exterior project timing across painting and parging together, our best time to paint exterior Toronto post lays out the Toronto calendar month by month.
What that means in practice:
- May to June: Ideal. Mild temperatures, low humidity, plenty of cure days before any cold snap.
- July to August: Workable, but heat means more aggressive misting to prevent flash drying.
- September to mid-October: Still safe most years. Watch the forecast for the first frost.
- Late October onward: Risky. We'll only quote if there's a stable warm window and we can tarp.
- November to April: Closed for parging in Toronto. Crack sealing with exterior caulk is the only winter move to stop the bleed.
Citation capsule: Toronto building permits do not typically require inspection for above-grade parging repair under Ontario Building Code Article 9.20, but the underlying CSA A179 mortar standard and Sika Type S product specifications both require a 5C minimum cure temperature for 48 hours and full strength at 28 days (Ontario Building Code Reg 332/12, 2024).
How do you prevent parging damage in the first place?
Even premium parging fails early if the conditions around your foundation work against it. A few maintenance habits drive most of the difference between a 5-year and a 20-year parging job.
Fix your grading. Soil should slope away from the house, dropping about 6 inches over the first 6 feet. If it slopes toward the foundation, rain pools against the wall and accelerates failure. Most common defect I see, by a wide margin.
Extend downspouts. Discharge at least 4 to 6 feet from the foundation. A short downspout is the fastest way to destroy parging in one season. I've quoted houses where three sides were perfect and one side was destroyed, and the destroyed side always had a short downspout.
Clear snow off the wall. Piled snow against the foundation means constant moisture all winter. When it melts and refreezes at the wall, the parging takes a beating. Shovel snow a few feet back.
Keep salt off the wall. Salt accelerates concrete deterioration. If you salt your walkway, sweep it away from the foundation in spring.
Inspect every fall. Walk the perimeter in September. Any crack you see now will be worse by April. One freeze-thaw cycle takes a hairline crack to a 1/4 inch gap. Thirty cycles take it to a missing chunk. A $300 crack in October is a $600 repair in April because the damage doubles over winter. If water gets through into the basement, you're suddenly into drywall, mould, and framing on top of parging.
Get your foundation checked before next winter
Walk around your house this spring. If you see cracks, flaking, exposed concrete, or hollow sections, get it fixed before October. Every freeze-thaw cycle compounds the damage, and Toronto hands you 30 to 40 of them every winter.
We assess foundation parging during any exterior painting quote at no extra charge. I'll tell you what needs repair now, what can wait one season, and what it costs in real CAD.
Call me at (416) 875-8706 or request a free quote. If I miss the call, I get back to you the same day.
Frequently Asked Questions
Spot repairs run $300 to $800 CAD plus HST. A full re-parge on a Toronto semi-detached costs $1,500 to $5,000 plus HST. A detached typically runs $2,500 to $6,500 plus HST depending on foundation height and prep. Prices include Type S mortar, bonding agent, and finish work. Heavy demolition or scaffolded heights add cost.
Properly applied parging lasts 15 to 25 years in Toronto. Surface prep, mortar quality, application thickness (two thin coats, not one thick one), and drainage all matter. Parging done without bonding agent or proper prep often fails in 3 to 5 years. Painting with elastomeric or breathable masonry paint after the 28-day cure adds another 5 to 10 years.
Small cosmetic patches up to a couple of square feet are doable for a handy homeowner. Materials cost $30 to $60 from any hardware store. Anything larger, or parging that keeps failing in the same spot, needs a professional. Most DIY patches fail because of poor prep or applying mortar too thick. You need to chip back to solid material and apply in two thin coats.
Parging is a thin mortar coating on the outside of your foundation above grade. It protects against surface moisture, road salt, and freeze-thaw damage. Waterproofing is a membrane or coating applied below grade to prevent water from entering your basement. They do different jobs. A house with good below-grade waterproofing still needs parging above grade.
Yes. Masonry paint adds another barrier and unifies the colour. New parging patches never match weathered parging, so painting the whole foundation hides the seams. Wait at least 28 days after new parging for full cure before painting. Use a breathable elastomeric or acrylic masonry paint, not a sealed alkyd. We bundle parging and painting at a discount.
May through October is the safe window in Toronto. Type S mortar needs ambient and surface temperatures above 5C for the first 48 hours of cure ([Sika Type S TDS](https://can.sika.com/), 2025). Acrylic-modified parging mixes extend the season into early November on warm days. Below freezing, even bagged products fail to cure and crack off by spring.
Wait at least 28 days for full Type S mortar cure before applying masonry paint (Sika Type S TDS, 2025). Paint earlier and trapped cure moisture causes the parging to fail from within. Use a breathable acrylic masonry paint or an elastomeric for hairline cracks. Avoid alkyd or oil-based foundation paints, which seal moisture in.
Generally no. Most Toronto policies treat parging as routine envelope maintenance, same bucket as caulking or paint, and exclude it. Damage from a covered event (impact, vehicle, fire) may be claimable, but freeze-thaw deterioration and age-related failure are not. Check your specific policy wording. Regular parging maintenance costs less than a deductible.
Not on its own. Parging protects above-grade foundation from freeze-thaw and surface moisture. Basement leaks almost always come from below-grade water entry, which requires drainage repair, weeping tile, or membrane waterproofing on the buried portion. That said, failed above-grade parging on the matching wall can contribute. Check both. CMHC''s foundation moisture guide treats them as separate systems (CMHC, 2023).
Type S is the higher-strength masonry mortar (around 12.4 MPa minimum compressive strength) rated for above-grade exterior structural applications. Type N is softer (around 5.2 MPa) and used for interior or non-load-bearing work (Sika Canada, 2025). For Toronto foundation parging exposed to freeze-thaw and salt, Type S with a polymer or acrylic modifier is the correct spec.
Not directly. Mortar will not bond to a painted surface. The paint has to come off in the area you are parging, usually with a wire wheel or chemical stripper, until you reach bare, clean concrete. Then apply bonding agent and parge as normal. This is one of the most common reasons DIY parging patches pop off after one winter.
Indirectly, yes. Realtors and inspectors flag visible foundation spalling on every Toronto pre-listing inspection, and buyers use it as leverage on price. A clean, painted foundation kills that objection. The $1,500 to $5,000 you spend on a full re-parge usually returns multiples in avoided price negotiation, on top of the protection it gives the structural concrete.