




Key Takeaways
- A lot of newer Toronto stucco is EIFS (foam-backed synthetic), not traditional 3-coat cement stucco. Repair materials and paint systems differ.
- Toronto averaged 61.9 observed freeze-thaw cycles per year over the 1971 to 2000 baseline (City of Toronto, Toronto's Current and Future Climate, Appendices), the single biggest reason stucco cracks reopen.
- Hairline crack repair: $200 to $500 CAD. Structural: $800 to $2,500 CAD. Full re-stucco: $8,000 to $25,000+ CAD. All plus 13% HST.
- Cracking traditional stucco takes a true masonry elastomeric. EIFS takes a breathable acrylic or its maker's approved finish, never a generic thick elastomeric.
- Repair window is roughly May to mid-October, when surface temperature holds above 10 C for 72 hours.
If you own a stucco house in Toronto, you already know the spring routine. New cracks. A bird hole near the soffit. A patch of moulding that sounds hollow when you tap it. After two decades of exterior painting in Toronto, I'll tell you the biggest mistake I see: they treat every stucco the same. A repair that works on a 1965 traditional 3-coat house fails on a 1998 EIFS box. Works the other way too. This guide walks through how to tell what you have, fix it correctly, and budget honestly in CAD. Repair is one piece of a bigger picture, and our overview of residential painting in Toronto covers where it fits, and the exterior house painting cost guide covers the budget.
What is the difference between EIFS and traditional stucco?
Toronto has both systems in quantity: traditional cement stucco on many older homes, and EIFS on a lot of newer builds and additions. Early EIFS was often face-sealed, with no path for water that got behind the finish to drain out, and drainage systems became the norm around 2000 (CEP Forensic). The two systems look the same at six paces. They behave nothing alike. Repair approach, patch material, and paint system all change based on which one you have.
Traditional 3-coat cement stucco
Traditional stucco is Portland cement and sand, applied in three coats (scratch, brown, finish) over wire lath nailed to wood sheathing. Total thickness runs 7/8 to 1 inch. It's rigid, heavy, sounds solid when you knock on it, and lasts 50 to 80 years with maintenance. Most Toronto stucco homes built before 1980 use this system. When I tap a traditional wall with my knuckle, it feels like knocking on concrete. No flex at all.
EIFS (synthetic stucco)
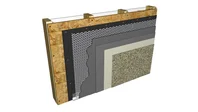
EIFS uses a foam board (expanded polystyrene, typically 1 to 4 inches thick) glued or mechanically fastened to the sheathing. Over that goes a thin polymer-modified base coat with fibreglass mesh embedded in it, then a coloured acrylic topcoat. The finish over the foam is roughly 1/8 inch. It insulates better than traditional stucco by a wide margin. The trade-off is the soft foam layer, which is why woodpeckers can punch through it and a stray baseball can leave a dent.
Canada's National Building Code now requires drained, rainscreen-style EIFS, with grooved insulation boards so water that gets behind the finish can escape, as the National Research Council explains (National Research Council Canada). The Canadian standards for EIFS materials, installation and design are the CAN/ULC-S716 series (EIMA). If your EIFS predates that shift, assume it may be face-sealed and treat every crack as a possible water path.
What kinds of cracks and damage show up on Toronto stucco?
Roughly 80 percent of the stucco failures I assess in Toronto fall into four buckets: hairline cracks, spider or structural cracks, spalling, and efflorescence. Each one says something different about what's happening behind the finish coat. Diagnosing it right is half the repair.
Hairline cracks (cosmetic)
Thin cracks under 1/16 inch (about 1.5 mm). Usually thermal cycling. On traditional stucco they appear randomly across the field. On EIFS they tend to cluster at sheet joints in the foam underneath. Cosmetic on day one. Every crack is also a future water entry point once the Toronto freeze-thaw cycle starts pumping.
That said, don't chase every hairline. The Stucco Manufacturers Association treats hairlines of about 1/32 inch and under as normal for cement stucco and generally not worth patching; the ones to fix are cracks you can see from 10 feet away or that let water in (Stucco Manufacturers Association).
Spider cracks (structural watch)
A cluster of cracks radiating from a central point, or diagonal runs from window corners. That pattern points to movement, either framing settlement or impact. On a spider pattern wider than about 1/8 inch, I pencil-mark the ends of each crack and watch it through a full season before the final repair. If the cracks keep growing, the wall is still moving, and a patch over a moving crack just reopens.
Spalling (water intrusion)
Chunks of finish coat lifting off, the surface turning powdery, or large areas sounding hollow when you press them. Spalling on traditional stucco means water got behind the finish and froze. Spalling on EIFS means the foam underneath is wet, which is the bigger problem because it can rot the sheathing if you ignore it. A Scarborough job last May showed me this the hard way. Soft EIFS area about the size of a placemat near a second-floor window. I opened it up and the OSB behind it was black. Hollow-sounding EIFS over roughly 60 cm across almost always has wet OSB behind it. Patching the finish is lipstick on a moisture problem.
Efflorescence (moisture migration)
White, chalky deposits on the surface, almost always traditional cement stucco, not EIFS. Those are mineral salts left behind as moisture migrates outward through the wall and evaporates. The deposits wash off. The reason they showed up (ongoing moisture movement) doesn't. Check flashing above the wall, caulking around penetrations, and grade away from the foundation. The same signs at the bottom of the wall are covered in our guide to foundation parging.
How does Toronto freeze-thaw damage stucco specifically?
Toronto averaged 61.9 observed freeze-thaw cycles per year over the 1971 to 2000 baseline (City of Toronto, Toronto's Current and Future Climate, Appendices, retrieved 2026). That number matters more for stucco than for almost any other cladding because of how stucco fails.
Water finds an opening. Could be a hairline crack, a failed caulk bead, a bird peck, a pinhole at a window flange. Overnight temperatures drop below freezing. The trapped water expands roughly 9 percent as it turns to ice. That expansion enlarges the original opening by a fraction of a millimetre. Next thaw, more water gets in. By the third freeze-thaw cycle, the crack is visible from the sidewalk.
The City of Toronto records 61.9 observed freeze-thaw cycles per year for Toronto over the 1971 to 2000 baseline, against a modelled median of 65.5 (City of Toronto, Toronto's Current and Future Climate, Appendices, retrieved 2026). Peak activity falls in March, when daytime temperatures swing repeatedly across the freezing point. Stucco repair scheduled after mid-October risks a freeze-thaw cycle before full cure.
That's why the realistic repair window in Toronto is May 1 through October 15. Patches need 72 hours above 10 C to cure properly, and I want a clear two-week stretch before the first hard frost if I can get it.
What materials do you need for stucco repair?
The materials list changes completely based on which stucco system you have. Using the wrong product is the single most common reason DIY repairs fail inside a year. Figure $40 to $90 CAD for materials on a typical small patch.
Hairline cracks on either system
Pre-mixed acrylic stucco patch in a tube or small pail. Quikrete and DAP make versions sold at every Home Depot in Toronto for $18 to $28 CAD. They're flexible enough to handle minor thermal movement and they adhere to both traditional cement and EIFS finish coats. Cut the crack open with a utility knife, dust it out, dampen, apply, tool to match texture.
Structural cracks on traditional stucco
Concrete bonding agent (Quikrete Concrete Bonding Adhesive, about $18 CAD per 1 L jug) brushed into the cleaned crack first. Then Type S mortar mix (about $14 CAD per 30 kg bag) packed in layers. Type S has higher compressive strength than Type N and is the right call for any structural patch in a freeze-thaw climate.
EIFS-specific patches
EIFS damage where the foam is exposed needs an EIFS-specific repair kit, not a standard stucco patch. Dryvit and Sto sell small-area consumer kits that include a base coat with polymer fibres, a strip of fibreglass mesh, and matching finish coat. About $60 to $110 CAD per kit. I tried regular stucco patch on an EIFS bird hole in North York early in my career to save a customer money. Popped off the next winter. Tried it once more two years later on the same logic. Popped off again. Now I just buy the kit. The synthetic finish needs a synthetic patch.
What paint system goes over repaired stucco?
Paint selection is where most Toronto stucco jobs go sideways. The finish has to match the substrate, not the homeowner's preference, and the two stucco systems want different paint. Roll regular exterior latex over either one and you'll trap moisture, then watch it peel inside 18 months.
A North York job from 2022 sticks with me. Previous painter had rolled one heavy, high-build masonry coating across the whole front elevation. Half the wall was traditional 3-coat above the foundation. Half was EIFS where the homeowner had built out a bumped-out family room in 2008. The traditional half was fine. The EIFS half was blistering by the second spring because the heavy coating had sealed moisture into the foam. We had to strip the EIFS half and recoat with 100 percent acrylic. Same wall, two systems, two answers.
Traditional 3-coat stucco: elastomeric
A true masonry elastomeric for cracking traditional cement stucco. Our default is Benjamin Moore Ultra Spec Masonry Elastomeric Waterproof Coating (K359 and K360 in Canada), which Benjamin Moore rates for cracks up to about 1/32 inch, with 300% elongation and alkali resistance to pH 13 (Benjamin Moore Canada). Sherwin-Williams' equivalent is ConFlex XL. Two coats, back-rolled into the texture. Loxon XP, which gets named here a lot, is Sherwin-Williams' high-build acrylic waterproofing masonry coating rather than an elastomeric. It's a good choice on sound masonry, but it won't stretch like one, and no coating holds a crack that's still moving.
EIFS: 100% acrylic, never thick elastomeric
EIFS already has a flexible polymer binder in the synthetic finish coat. Add a thick elastomeric on top and you create a vapour sandwich that traps moisture in the foam layer and accelerates failure. The right call is a flat or low-sheen 100 percent acrylic exterior at standard mil thickness. Most EIFS manufacturers (Dryvit, Sto, Senergy) publish approved coating lists. Check the list before you buy. Sto, for example, recommends vapour-permeable acrylic finishes, asks for colours with a light reflectance value of 20 or higher on foam-backed systems, and warns against pressure washing or sandblasting EIFS (Sto Corp).
One more EIFS rule for whoever is caulking: on a drained system, never seal the weep gaps at the bottom edge or the drainage details over windows. Those openings are how the wall lets water out, and caulking them shut turns a drained system back into a face-sealed one. Windows and roof-to-wall junctions are the usual leak points, so check the sealant there first (CEP Forensic).
Temperature limits decide when that coating can go on, which we map month by month in the best time to paint an exterior in Toronto.
How do you repair hairline and structural cracks step by step?
A clean repair has six steps regardless of crack size. You scale up from hairline to structural by changing materials, not method. Patches that fail inside two years almost always skipped step 2 or step 5.
Step 1: Open the crack
Use a utility knife or cold chisel to open the crack into a V-groove, slightly wider at the back than the front. The undercut creates a mechanical lock so the patch has something to grip. Without it, patches pop out the first Toronto winter.
Step 2: Clean
Brush out dust, loose material, and any old caulk. Vacuum if you have a shop vac. Dust is the single biggest reason patches fail to bond.
Step 3: Prime or wet
Traditional stucco: brush bonding agent into the cleaned crack. EIFS: dampen with a spray bottle. Do not use cement bonding agent on a synthetic finish. Either way the surface needs to be prepped properly, not dusty and not soaking wet.
Step 4: Patch
Press patch material firmly into the opening with a putty knife. For cracks deeper than 6 mm, fill in two passes and let the first one set up for a few hours. Overfill slightly. All stucco patches shrink as they cure.
Step 5: Texture match
While the top layer is still workable (you have roughly 20 to 30 minutes) replicate the surrounding texture. Damp sponge for smooth. Stiff bristle brush for sand. Flicked-on droplets for dash. Practice the motion on a scrap of cardboard before you touch the wall. A patch you can't see beats ten patches you can.
Step 6: Cure and paint
Keep the patch damp for 48 to 72 hours by misting two to three times daily. Wait a full seven days before painting. Apply the right system for your substrate (elastomeric for traditional, 100% acrylic for EIFS), two coats, back-rolled.
What does stucco repair cost in Toronto in 2026?
Toronto stucco repair pricing in 2026 runs from $200 CAD for a small hairline patch up to $25,000+ CAD for full re-stucco on a large home. The spread is wide because the damage underneath varies more than the surface you can see. All figures below are CAD and exclude 13% HST.
| Repair type | DIY materials | Professional (CAD, pre-HST) |
|---|---|---|
| Hairline crack patch (one area) | $20 to $40 | $200 to $500 |
| Spider/structural crack repair | $40 to $90 | $800 to $2,500 |
| Spalling patch (1 to 4 sq ft) | $60 to $120 | $1,200 to $3,500 |
| EIFS bird hole repair (first) | $60 to $110 (kit) | $550 |
| EIFS bird hole each additional | Same kit | $150 |
| Moulding profile rebuild (per ln ft) | Not practical | $50 to $150 |
| Full elastomeric recoat (avg detached) | Not practical | $4,500 to $9,500 |
| Full re-stucco (avg detached) | Not practical | $8,000 to $25,000+ |
Pricing reflects 2026 quote ranges from our own Toronto job book across 47 stucco assessments completed January through April 2026. Bird hole pricing matches our standard service rate for stucco repair and painting callouts.
For context on full exterior project budgeting, see our Toronto exterior painting cost guide.
When should you DIY and when should you call a pro?
Roughly 30 percent of the stucco repairs we quote in Toronto could have been DIY if the homeowner caught them early. The other 70 percent need a pro because of access, scale, or because the wrong product was already on the wall. Here's where I'd draw the line.
DIY is reasonable for:
- Hairline cracks under 1.5 mm on ground-floor side or back walls
- Small EIFS bird holes under 75 mm where foam is intact
- Cosmetic chips on the field of the wall (not at corners or windows)
Call a pro for:
- Anything above the first storey (ladders dent EIFS even with stand-offs)
- Cracks wider than 6 mm or radiating spider patterns
- Spalling or hollow areas larger than a dinner plate
- Front-elevation repairs where texture matching matters for resale
- Any damage where foam or sheathing is exposed
- Soft, bulging, or hollow EIFS anywhere, which calls for a probe moisture test before any cosmetic patch, so you know whether the sheathing behind it is wet (InterNACHI)
- Moulding profile rebuilds (window surrounds, cornices, band courses)
Full details are on our stucco repair and painting page.
Get your Toronto stucco assessed
If you can't tell whether your damage is hairline, spalling, or a deeper EIFS problem, get it assessed before you start patching. A repair that hides trapped moisture or ongoing foundation movement just delays the real fix and triples the eventual cost.
We assess stucco condition as part of every exterior painting and stucco repair quote in the GTA. You'll get an honest call on what's DIY-able, what needs professional repair, and what's fine to leave alone for another season.
Call me directly at (416) 875-8706 or request your free quote. If I'm on a ladder when you call, leave a message and I'll get back to you the same day.
About the author
Chad Caglak is co-owner of Home Painters Pro Toronto and a 20-year working painter. He's assessed and repaired both EIFS and traditional 3-coat stucco across Etobicoke, North York, and Scarborough, and writes the craft-and-pricing content here so Toronto homeowners can fix a crack once instead of patching it every spring. Read more in the exterior house painting cost guide or best paint for stucco.
Frequently Asked Questions
Hairline crack patching runs $200 to $500 CAD per area. Larger structural repairs with bonding agent and Type S mortar run $800 to $2,500 CAD. Full re-stucco on an average detached home runs $8,000 to $25,000+ CAD. All figures plus 13% HST. DIY materials for a small EIFS patch cost $40 to $90 CAD at any Toronto hardware store.
Knock on it. EIFS sounds hollow and the surface gives slightly under firm pressure because foam sits behind the finish coat. Traditional 3-coat stucco sounds solid and feels rigid. Older Toronto homes, especially pre-1980, typically have traditional cement stucco over wire lath, while EIFS became common on newer builds and additions.
Cracking traditional 3-coat stucco performs best with a true masonry elastomeric such as Benjamin Moore Ultra Spec Masonry Elastomeric, which bridges hairline cracks up to about 1/32 inch. EIFS should be painted with a flat or low-sheen 100 percent acrylic exterior or the EIFS maker's approved finish, never a generic thick elastomeric, because the synthetic finish coat already includes a flexible polymer binder.
Anything wider than a hair, roughly 0.3 mm, needs to be opened, cleaned, and patched before paint. Masonry elastomerics bridge true hairline cracks, but they will telegraph through any unfilled crack wider than that within one or two freeze-thaw seasons. Patching is not optional for structural cracks.